


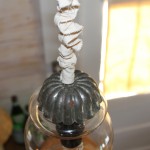
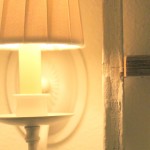
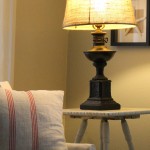
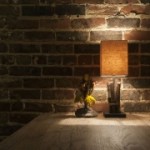
- Completed Lamp.


Completed Lamp.
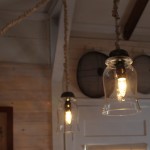
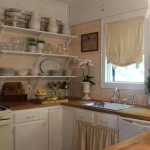
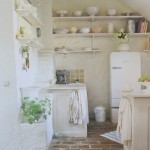
Lighting had always been an issue in my kitchen but since the renovation had a strict budget…I had to be very creative. I needed some lighting over the new peninsula and the solution seemed to be to swag the lighting over from the only ceiling junction box in the kitchen.
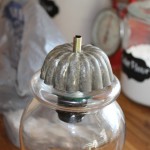
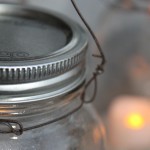
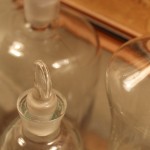
All the pendant lights that I looked at, even the simpler designs were budget busters…so I resorted to making my own when I came upon some hurricane globes at Michael’s. The shape of the globes really spoke to me and I already had an idea to use some rustic, vintage, scalloped tart pans as an embellishment to hide the wiring.
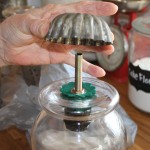
Including the globe, lamp parts and wiring, each of these lamps came in at about $11 each. I also spent $10 on a special drill bit that was used to drill the hole in the bottom of the globe.
If you want to try a project like this on your own, one thing to look for are glass vessels that don’t have super thick bases. Thicker bases can take 30 minutes or so to drill through and they can fry your glass drill bits. If you find a beautiful glass vase or vessel that has a thick base that you simply must use…take it to the closest glass shop. They will usually drill the hole for you at a cost of $15 – $25 per hole. It can get a bit pricey…so just a fair warning from the voice of experience!
xoxo.
Cindy, Samantha and Lillie.
As a post script, I am submitting this article for consideration for a feature in Cottages & Bungalos. Stop by the blog when you have some time, there are some terrific entries already:
[hana-code-insert name='cottagesbungalos' /]
-
- Completed Pendant Lamp.
-
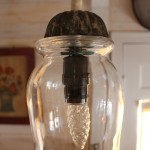
- Completed Pendant Lamp.
-
- Completed Pendant Lamp.
-
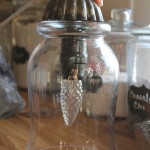
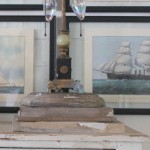
- Lamp during pre-assembly.
-
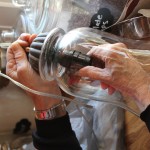
- Lamp during pre-assembly.
-
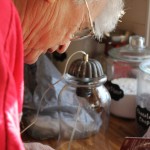
- Dad.
-
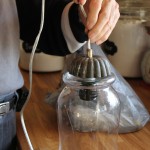
- Lamp during pre-assembly.
-
- Lamp during pre-assembly.
-
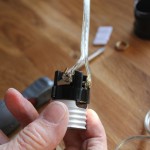
- Lamp during pre-assembly.
-
- Lamp during pre-assembly.
-

- Lamp during pre-assembly.
[hana-code-insert name=’Half Banner’ /]


This is exactly the idea I had for above my sink and main prep area, only using wine bottles. Assuming that the lamp assembly parts come with all the necessary instructions, I think I am going to try this — two above the sink (in place of a spectacularly AWFUL florescent fixture — so, no swagging needed, there) and then swag one or two over to my main prep area, right next to the sink. How many did you dare splice to the box? Who advised you on how many/how would be safest? I guess I’ll need to have a glass company cut the bottoms off of the bottles, but I need to see them for a piece of glass for a new cupboard door, anyway — do I smell discount? Thanks, for this, Cynthia!
Wine bottles are a GREAT idea! If you are open to some direction…check IKEA or the home store. They generally have kits for making lamps that include the socket and cord for $10 or so. If you can’t find a kit, you can still make what you need with a simple purchase of a socket and wiring. Take the wine bottles you intend to use to a glass shop. This kind of glass cutting is easy for them, but ask them to grind the cut edges so it is safe to touch. Your wiring will slide upwards through the bottle neck and the bottom of the bottle will be cut off and allow the light to come through and ease in changing the bulb. As another suggestion, depending on the cost of cutting and grinding the glass, I have seen many times where old wine bottles are made into drinking glasses, vases and candle holders by cutting off the TOP of the bottle. So if you like the result of you wine lighting, you can create some continuity by using wine bottles for other purposes in your kitchen. In regard to wiring to the junction box, I wired the lamps to the junction box in the ceiling like you would any other lamp. Thanks for looking at the blog…I appreciate it sooo much. Hope this helps and send pictures when you are done, I would love to post them as inspiration for someone else:)
Wow, this article is fastidious, my sister is analyzing these kinds of things, so I
am going to inform her.
awesome…i appreciate you stopping by and commenting and passing it along. Have a terrific evening!
Love the way these came out! What a great idea. Did you make the cover for the cord yourself, or did you find that somewhere?
Looks great!
~Teresa
Teresa, thank you. Yes, I made the cord cover myself using natural ticking that I found at walmart. It is the same fabric that I used for the roman blinds and cabinet curtains seen throughout the rest of the kitchen. A fried of mine who is “in the know” in the world of design told me that gathered cord covers are on their way out and that I should remove some of the fabric so there isn’t so much gathering. I am on the fence about whether I will do that or not, but for now…I am happy with them. Thanks for stopping by, I really appreciate it!