A light along Winter’s path…

The Midnight Rider.

With a twinkle in our eye, we set out to make lanterns to light the way to welcome one and all this holiday season.

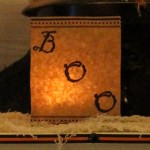
Using vintage mason jars as a starting point, we created these maintenance free lanterns for Christmas.  Using inexpensive battery operated candles with timers, we fashioned a holder out of polymer clay to keep the candle in place and up right and tossed in mica at the bottom as snow.  These cozy lanterns become a beacon on a cold winter’s night for friends and family.

Lighting the way home.

It’s really very simple.  Here is what you need:

  1. Large, half gallon Mason Jar (best prices are online)
  2. Battery operated candles, with timer from at Lowe’s (click here)
  3. Mica Flakes
  4. Polymer Clay
  5. Hobby Store Glue Dots

Polymer Clay shaped, baked as a holder to stabalize the candle and hold it upright. Then secured with glue dots to the bottom of the mason jar:

Polymer Clay fashioned into a stabalizer/holder for the candle.

Remove the factory holder from the candle (candle is too tall for jar, otherwise):

Factory candle holder easily removes.

Insert the candle into the polymer clay that you just secured to the bottom of the mason jar:

Secure polymer clay to bottom of jar with glue dots.

Add mica flakes as snow:

Add mica flakes for snow.


Light a walkway, or as we did…place in multiples on the porch rail.

These projects were made possible with the support of my sponsors.  Please give them a visit.

GOOD LOOK, Inc.

The Christmas Haus


The Christmas Porch

Pictures from Christmas past at the little white cottage.

I hope you find some inspiration.

Always,

Cindy


A Chippy Christmas Urn.

A Vintage Watering Can dressed up for Christmas

Fresh Christmas Arrangement

Pepperberries and Fresh Christmas Greens

Home Made German Glass Glitter Santa Boot with dried Hydrangeas

The Attic Faux Fireplace

The Attic Bedroom.

Winter Quilts.

Ironstone Bowls full of Christmas.

The Sitting Room.

The Guest Room at Christmas

The Christmas Headboard.


My All Time Favorite Christmas Issue


A Scenic Winter View.


Country Living HOLIDAYS 2002.  I have read that issue literally hundreds of times and in ten years,  it continues to resonate with me, not just during the holidays, but all year long.  One particular article about a family who lived in a small barn as their main house was being re-built after a fire is the one that caught my eye.

The barn had been decorated to have all the comforts of home while the family was temporarily displaced.  I loved the worn surfaces and the light palette.  I was drawn to the antique pieces that had a European feel to them.  I admire the the utter simplicity. As a result, I have spent the last 9 years trying to emulate that style in my own little cottage.

Since this was a holiday issue, the lodging has been decorated in a really restrained way for Christmas, but feels no less festive than the most decorated homes.  As the holidays have come and gone, I find myself trying to do more with less.  Having an appreciation for simplicity and the reduction in stress that goes along with it.

Thanks for stopping by for my first Christmas post.  I hope you find some inspiration.

Always,

Cindy

celebrations,Christmas,holidays,Santa Claus,special occasions

My All Time Favorite Issue.

The Winter Barn.


The Cozy Cottage Kitchen.

Where we gather.


The Well Appointed Couch.

Lovely Old Doors.

White Painted Plank Walls.

Dormers and Angles Make Cozy Nooks.

A Hint of the Holidays


19th century scalloped cookie cutters.


I am thinking alot about the holidays.  The decorating I want to do, the things I want to bake and the gifts I want to give.  Standing in the check out stand at the grocery store, I spied a holiday cookie magazine and decided to give one recipe a try.  My lovely neighbor, Darlene and her family are always the recipients and by extension, the judges of my experiments.  Seems to be thumbs up all the way around for these delicious and festive Cherry Almonds Half Moons.  Looks like they will find a permanent place in my recipe files. Recipe after the pictures below.

Cheers to what lies ahead.

I hope you find some inspiration.

xoxo.

Cindy

Chilled and freshly rolled.

A dollup of cherry pie filling.

Not neat, but lovingly home made.


Folded over, sealed and ready for the oven.

Almond glaze drizzled on the warm, just out of the oven cookies and topped with sliced almonds.

Warm pastry enveloping a sweet, cherry center.

A treat for the Holidays.

Cherry Almond Half Moons

1 c. butter, softened

1 8 oz package of cream cheese, softened

1 t. almond extract

2 c. all purpose flour

1/2 c. canned cherry pie filling or cherry preserves

2 egg whites

3/4 c. powdered sugar

1/4 t. almond extract

1 – 2 T. water or milk

1/2 c. of sliced almonds

1. In a large mixing bowl, beat the butter and cream cheese with an electric mixer on medium to high speed for 30 seconds.  Beat in 1 t. of almond extract until combined.  Beat in the flour, on low, until dough comes together.  Divide dough in half.  Wrap each half in a disc shape in clear wrap and chill dough for about 1 and 1/2 hours or until dough is easy to handle. A couple of notes on the dough.  Once it is mixed, the dough is actually a little bland.  However, once it is filled with the filling, baked and add the sweetness of the glaze…it all seems to come together very well.  Secondly, if the dough is too hard once it comes out of the fridge, let it sit to soften a bit.  It needs to be somewhat pliable to roll out properly.

2. Preheat oven to 375 degrees.  Line cookie sheets with parchment paper, set aside.  On a lightly floured surface roll half of the dough at a time to 1/8 inch thick.  Using a 3 – inch scalloped-edge round cookie cutter, cut out dough.  place the rounds 1 inch apart on the prepared cookie sheets.

3. Spoon 1/2 t. of filling in the center of each round.  Fold dough rounds in half, enclosing filling; press edges to seal.  Whisk egg whites until frothy; brush cookies lightly with egg wash.  Bake 12 to 15 minutes or until cookies are light brown.

4. In a small bowl, stir together powdered sugar, the remaining almond extract, and enough of the water or mil to make the icing a drizzling consistency. Sprinkle with almonds.  Let cookies stand until icing is set.  Makes 32 cookies. (recipe from Better Homes & Gardens)


We Remember.

Flags 'n Flowers.

Lunch Sack Luminaries

I think that old houses are meant to be decorated for the holidays.  These luminaries are a project that can change with the seasons.

Lunch Sack Vintage Patriotic Luminaries, with a little patience, are easier than you would think.  I created these in MS Power Point.  The key is to create a custom page size ( to mirror the size of a lunch sack) in the advance options button in the printing box.  You will also want to adjust the type of paper setting (set it for thicker paper) and probably, depending on your printer, use the manual feed tray.  The patience part comes from figuring out which way to load the lunch sack…each printer loads differently so experiment until you get it right.

A little trial and error for image placement and some vintage Victorian clip art and it is a great way to pay homage to the men and women who have fallen.

I hope you and your family have a wonderful and safe holiday weekend.

Always,

Cindy

We Remember.

Beautiful Vintage Victorian Images.

For the Fallen.

Patriotic Finials.